1. Installation of blower
1. The blower should be carefully checked before installation:
①what the blades and chassis are damaged or deformed due to transportation, otherwise they should be repaired before they can be installed?;
②The blade and the hair dryer have collided due to loose coupling bolts. If the gap between the blade and the hair dryer is uneven, it should be adjusted before installation.;
③Whether the connection of each component is fastened;
④Is the insulation performance of the motor good?;
2. Put a circle of damping rubber strips about 5mm thick on the prefabricated installation basis, lift the blower to the installation basis, and use bolts to fasten the blower base and the foundation after correction and leveling. The bolt position is on the vertical surface of the foundation to prevent rainwater from seeping into the blower. The exposed bolt head is sealed with glass glue.
3. When the blower number is 3-5#, there is a bolt in the middle of each side of the foundation. When the foundation is concrete, it is fastened with M8×80 steel expansion bolts; when the foundation is steel structure, it is fastened with M8×40 bolts.
When the blower number is 6-9#, two bolts are distributed on each side of the foundation. When the foundation is concrete, it is fastened with M10×95 steel expansion bolts; when the foundation is steel structure, it is fastened with M10×45 bolts.
When the blower number is 10-14#, three bolts are arranged on each side of the foundation. When the foundation is concrete, it is fastened with M12×110 steel expansion bolts; when the foundation is steel structure, it is fastened with M12×45 bolts.
When the blower number is 15-18#, four bolts are arranged on each side of the foundation. When the foundation is concrete, it is fastened with M12×110 steel expansion bolts; when the foundation is steel structure, it is fastened with M12×50 bolts.
When the blower number is 20-24#, four bolts are distributed on each side of the foundation. When the foundation is concrete, it is fastened with M16×150 steel expansion bolts; when the foundation is steel structure, it is fastened with M16×50 bolts.
4. The lifting blower must be supported by a hook and cable to support the blower, and it is not allowed to hook the edge of the hood with a hook for lifting.
5. For large-size blowers that are packaged in parts with the hood and the main body at the time of supply, the main body of the blower should be installed on the foundation first, and then the hood should be installed on the main body of the blower.
6. When the inlet of the blower needs to be connected to the duct, the soft joint transition connection shall be applied, and the weight of the pipe shall not be allowed to be added to the blower components.
7. During the installation of the blower, you must take it lightly and avoid barbaric installation. After the blower is installed, the impeller must be toggled to check whether there is any phenomenon of the impeller touching the hair dryer. If something is found to be wrong, it must be adjusted.
2. Commissioning, operation, and maintenance of the blower
1. Start of the blower:
The blower should be carefully inspected before starting. The contents of the inspection are:
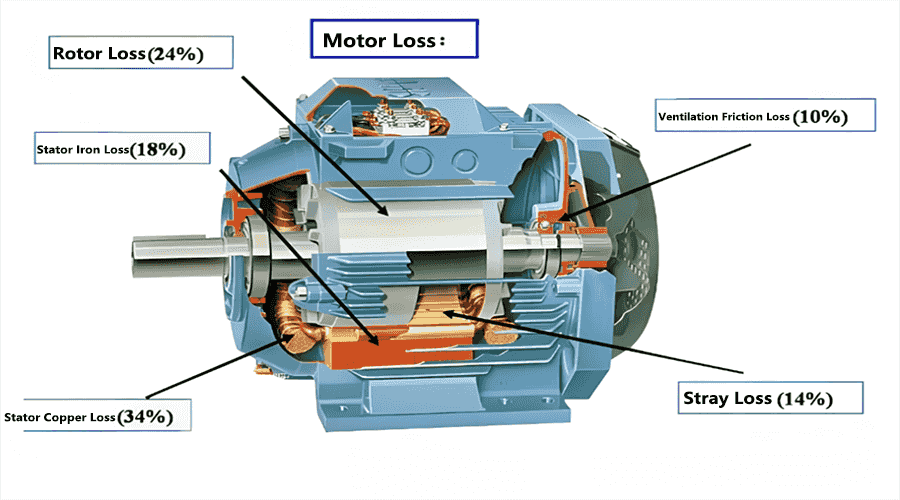
①The insulation performance of the motor is good, and the motor wiring is correct and firm.
②Check whether the lubrication of the bearing is intact, and the bearing must be in good lubrication condition before it can be started.
③Rotate the impeller of the blower a few times to check whether the impeller is stuck and rubbed. If so, it must be adjusted.
④Check whether there are any debris in the blower housing that hinders the rotation, and if so, all should be removed.
⑤Whether the foot bolts of the blower are loose. It is necessary to ensure that the foot bolts are firm, otherwise it will cause strong vibration of the blower.
⑥Whether the blower impeller is reversed or not, if it is reversed, the impeller must be completely stopped before it can be started again. The direction of the air flow of the blower must be consistent with the direction of the air flow on the housing.
⑦In order to extend the life of the motor, the high-power motor should be started with step-down.
2. Normal operation and maintenance of the blower:
①The normal operation of the blower is mainly to monitor the current of the blower, and over-current operation is strictly prohibited.
② Always check whether the bearings in the blower are normal and whether there is friction, collision sound, etc.
③Always pay attention to the loosening of the connecting bolts in all parts of the blower, pay attention to the abnormal sound made by the motor and blower, and find problems and deal with them in time.
④Regularly remove dust, dirt and other debris from the inside of the blower, and prevent corrosion.
⑤For every 2500 hours of operation of the blower (about half a year), the motor and blower should be thoroughly inspected at least once. If the bearing grease is found to have deteriorated, it must be replaced in time. The bearing must be cleaned with gasoline before replacement. The grease adopts lithium-based grease, and the amount of grease added is appropriate for two-thirds of the clean chamber volume of the bearing (one-half of the two-pole motor is appropriate).
⑥In normal operation, if the following conditions are encountered, it should be stopped immediately for inspection or repair:
A. The temperature rise of the motor exceeds 70℃.
B. The motor is smoking.
C. There is a strong vibration or a loud rubbing sound.
If you stop for inspection, cut off the motor power supply and mark it to avoid accidents.
3. Common blower failures, causes of failures and maintenance methods
common
fault
Cause of failure
Maintenance method
one、
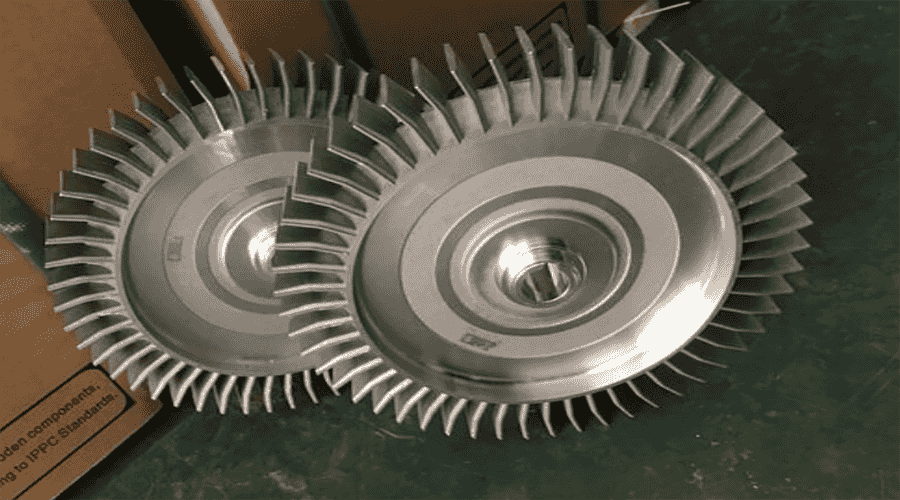
leaf
wheel
loss
bad
or
change
shape
1. The rivets and blades are loose.
2. Corrosion or wear of the blade surface or rivet head.
3. The skew of the impeller is too large after deformation, causing the radial and axial beating of the impeller to be too large.
1. Fasten the rivets or replace the rivets.
2. If the system is individually damaged, replace individual parts. If the system is semi-damaged, replace the impeller.
3. After removing the impeller, correct it with a hammer.
two、
vibration
move
1. Rub the outer cylinder when the impeller rotates;
2. Damage to the dynamic balance of the impeller:
①The roller is deformed by pressure during installation or storage and transportation
②the weight of the blade is asymmetrical, or part of the blade on one side is corroded or part of the wear is serious.
③Uneven attachments are attached to the leaves, such as rust, ash, oil, etc.
④The balance has not been balanced after the overhaul.
3. The fixed part of the rotor is loose:
①The connection between the impeller and the shaft is loose
②the connection between the impeller and the shaft is loose, and the front cover nut of the impeller is loose.
4. The foot bolts of the blower are loose, and the base connection is not firm; the motor fixing bolts are loose.
5. The stiffness of the foundation is not enough or firm, which causes the imbalance of the rotor and causes severe resonance.
6. The bearing is damaged; the grease is inferior or deteriorated.
1. The impeller or outer cylinder is deformed, and the gap between the impeller and the outer cylinder is corrected.
2、
① Correct the impeller.
② Replace the broken blade, or replace the new impeller, and do a good job of balance.
③Remove attachments from the leaves.
重 Re-balance
3、
① Tighten the nut.
②Repair the shaft and impeller, reassemble the keys, and tighten the cover nut.
4. Tighten the foot bolts or tighten the motor fixing bolts.
5. Carry out appropriate repairs and reinforcement to fill the gaps.
6. Replace bearings or grease.
three、
electricity
machine
hair
hot
super
electricity
flow
After running at room temperature for one hour, if the motor temperature rise is found to be too high, it may be caused by one of the following reasons:
1. The motor bearing is damaged or the grease is inferior or deteriorated.
2. The tolerance of the installation of the motor shaft and the blower bushing does not meet the technical requirements.
3. The system resistance is too large, the motor is overloaded, and the blower selection is unreasonable.
4. The power supply voltage is too low.
5. The motor is running out of phase.
1. Replace bearings or grease.
2. Reformulate to meet the prescribed requirements.
3. If the selection is unreasonable, replace the blower. If the valve is opened too large in the centrifugal roof blower pipeline, close the small valve.
4. Ensure that the blower power supply voltage meets the standard requirements.
5. Check whether the motor wiring is loose, etc.
Take the table above
four、
wind
machine
wind
quantity
reduce
less
1. The blower rotates in the opposite direction.
2. The air temperature is too low or the gas contains impurities, which increases the air density.
3. The pipeline in the centrifugal roof blower is blocked or the valve is not opened.
4. The blades are severely worn out.
5. The motor shaft and impeller are loose.
6. Improper selection of blower type.
1. Change the steering and change the motor power connection method.
2. Increase the air temperature and reduce the air density and viscosity.
3. Open the valve to remove the blockage.
4. Overhaul the blade or replace the impeller
5. Overhaul and tighten the impeller
6. Reselect the blower or increase the blower speed to increase the motor power.